Zooming in Premiere Pro means one of three things. Punching in on the video itself with the Scale property, zooming the timeline so you can see your cuts, or zooming the preview monitor. Each one lives in a different corner of the interface, and each takes about ten seconds once you know which corner.
How to zoom in Premiere Pro on a video clip
To zoom in on a clip, select it, open the Effect Controls panel, and raise the Scale value under Motion.
- Select the clip in your timeline.
- Open Effect Controls. If the panel isn't visible, it's under Window in the menu bar.
- Twirl open Motion and raise Scale past 100. A punch-in of 110 to 120 reads as intentional without screaming.
- Drag the Position values to reframe where the punch lands.
That's a static zoom, the whole clip stays punched in. Mind your resolution headroom while you're in there. Scale blows up pixels, so a 4K clip in a 1080p sequence gives you room to spare, while a 1080p clip in a 1080p sequence goes soft as soon as you pass 100.
How to make a smooth zoom in Premiere Pro
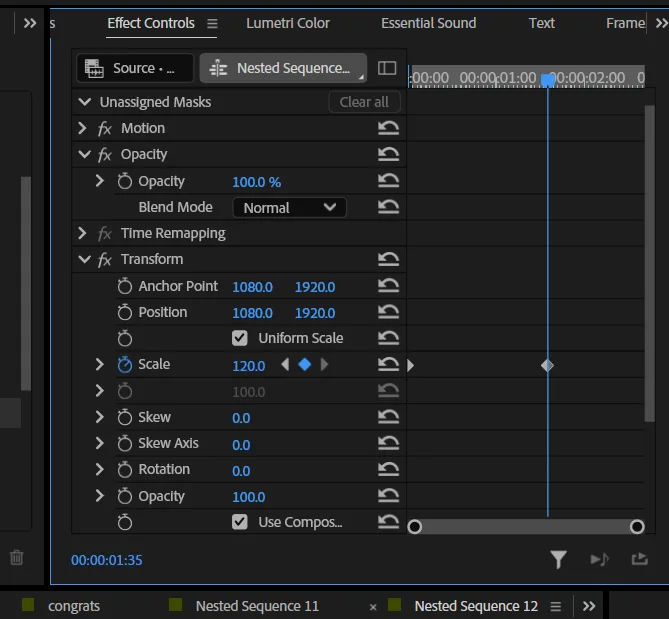
A smooth zoom is two Scale keyframes with eased interpolation between them, exactly as Adobe's own guide lays it out.
- Park the playhead where the zoom should start and click the stopwatch next to Scale (and Position, if you're reframing too). That drops your first keyframe.
- Move the playhead to where the zoom should end.
- Raise Scale to the level you want to land on. The second keyframe lands automatically.
- Play it back. If the movement starts and stops abruptly, right-click the first keyframe and apply Ease Out, then Ease In on the last one. The zoom now accelerates and settles like a camera move instead of a light switch.
Two keyframes close together make a snap zoom. The same two keyframes spread across the clip make the slow creep documentaries lean on. Same recipe, different spacing.
How to zoom in on the timeline in Premiere Pro
The equals key (=) zooms the timeline in, minus (-) zooms out, and backslash () fits the whole sequence in the window.
The Timeline panel has to be active for the keys to register, which is the usual reason they seem broken. Beyond the keys, the horizontal zoom bar at the bottom of the timeline does the same job, drag its edges to stretch or shrink the view, and a trackpad pinch works with the panel focused. None of this touches your video. Timeline zoom is pure navigation.
Zoomed preview? Check the Program Monitor
If the preview suddenly looks cropped but the exported video is fine, the Program Monitor's zoom level is set above Fit.
The monitor has its own Select Zoom Level menu, and a stray click there crops the preview without touching a single clip. Set it back to Fit and the picture returns. It only ever changes what the monitor shows you, never what renders, which is exactly why it's such a disorienting thing to hit by accident.
Why punch-ins pair with jump cuts
The most common reason to zoom in Premiere Pro at all is hiding a cut. Trim a pause or a flubbed line in a talking-head shot and the frame jumps. Punch one side in by 10 to 20 percent and the jump cut reads as a deliberate camera change instead of a mistake.
That makes zooming half of the cleanup workflow, and the other half is making the cuts. Silence Remover finds and cuts the dead air, and SilentCut for Premiere Pro drops those cuts on your timeline as regular edit points, ready for a punch-in wherever the jump shows. The panel installs like any other Premiere Pro plugin. SilentCut (silentcut.ai) isn't public yet.